W-957 Assembly Instructions:
Weaver® Wheel Balancer Factory Reset:
Weaver® Wheel Balancer Mounting Instructions:


W-957 Wheel Balancer Calibration:
New Style W-MJ II Motorcycle Adapter Kit:
Wheel Balancer Truck Kit:
Weaver® W-937/W-957 ALU Modes:
W-937 & W-957 Sensor Testing:
Troubleshooting Wheel Balancer Error Codes:
W-957 Wheel Balancer Video Transcripts
W-957 Quick Start Guide Transcription
Welcome to DerekWeaver.com. In this video, we will discuss receiving, unpacking, and assembling your W-957 wheel balancer. We have added several labels to the crate prior to shipping, in addition to the address label. The green warning label is an indication to the freight company the product should not be double-stacked to limit damage. The white warning label provides instructions to you, the user, regarding inspection and signing of the delivery receipt. And the orange label is an indication to the freight company the product should be handled with extra care. Your wheel balancer will ship in an undamaged crate similar to this crate. When you receive the balancer, prior to signing the delivery receipt, it is important that you inspect the crate for damage. If your inspection reveals damage, be certain to note the damage on the delivery receipt prior to signing the delivery receipt.
The first step in unpackaging the wheel balancer is undoing the 10 tabs at the bottom of the crate. The second step in unpackaging your wheel balancer is removing the top of the crate. You will probably need assistance for this step. After the crate has been removed, inspect the wheel balancer for damage and remove the shrink-wrap. Hold the hood in place after removing the stretch film as it is unbalanced and can fall and be damaged. Remove the accessory box, which is a little bit heavy, and set it to the side. And now you can remove the hood. Unbolt the wheel balancer from the skid using a 10 millimeter socket. Remove the two handles from the accessory box; we will use those as lifting points to remove the balancer from the skid. Now we will install the storage pegs on the left side of the balancer as seen here. This gives a good, solid lifting point for removing the balancer from the skid. Now remove the balancer from the skid.
Now that we have unpackaged the wheel balancer and placed it in its desired location, we can begin the assembly. We will begin the assembly by adjusting the display. To vertically adjust the display, you must loosen the four 10-millimeter nuts on the back right-hand side of the machine, raise the display to its desired location, and gently tighten the four 10-millimeter nuts on the back right-hand side of the machine. Loosen the two wing nuts on the back of the display to adjust the display. Now you can rotate the display arm to the desired location. Once you have the display adjusted to your satisfaction, you can tighten the two wing nuts on the back of the display and tighten the four 10-millimeter nuts on the right-hand side of the machine.
The next step is to install the 36-millimeter shaft using an 8-millimeter Allen wrench. To begin the installation of the hood, remove the two hood bolts with an 8-millimeter Allen wrench and a 17-millimeter socket. Now slide the hood onto the hood shaft. With the hood on the hood shaft, align your bolt holes and insert your Allen head bolt. Screw the 17-millimeter nut onto the bolt and tighten. Now that you've assembled your wheel balancer, you can plug it in and power it on with the power button on the left-hand side of the machine.
At this point, we will go through the function of each button on the display panel. When you initially turn on the machine, it is set for dynamic two-plane balancing, clip on weights on the inside and outside of the wheel, and the weight units is set to grams. Each button on the display board has a specific function. We will now explain the function of each button:
- The DIS+ and DIS- buttons allow you to enter the distance dimension.
- The BR+ and BR- buttons allow you to enter the wheel width dimension.
- The DIA+ and DIA- buttons allow you to enter the wheel diameter dimension.
- The house button allows you to enter the program mode to change factory settings.
- The People button or precision button, when depressed, gives you the exact amount of imbalance for a given tire wheel assembly.
- The C button changes your weight measurement from ounces to grams.
- The STA/Dyn button changes from static to dynamic mode.
- The MOT button changes to motorcycle mode and allows you to balance motorcycle wheels when you have the proper accessories.
- The ALU1 button allows you to enter the alternative weight placement mode 1, which requires stick-on weights on the inside and outside of the wheel.
- The ALU2 button allows you to enter alternate weight placement mode 2, which allows you to use stick-on weights only on the inside of the wheel.
- And the ALU3 button allows you to enter alternative weight placement mode 3, which requires a clip-on weight on the inside and a stick-on weight on the inside.
- The stop button clears your windows, inner and outer, and also stops the machine during the spin cycle.
- The start button begins a spin cycle.
Your W-957 wheel balancer is now unpacked and assembled. Prior to use, we recommend calibrating the machine. Thank you for choosing DerekWeaver.com for all of your automotive equipment needs.
Weaver® Wheel Balancer Factory Reset Transcription
Welcome to the Derek Weaver Company. In this video, we'll be performing the factory reset procedure on both the W-957 and W-937. The procedure is almost identical in both machines. View the full transcription here.
Weaver® Wheel Balancer Mounting Instructions Transcription
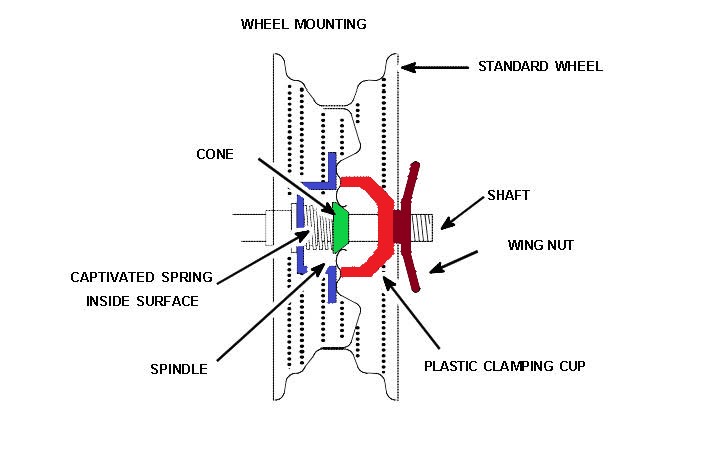
Welcome to the Derek Weaver Company. In this video, we're going to detail the proper mounting techniques for the provided adapters with all of our balancers as well as some optional mounting adapters. View the full transcription here.
W-957 Wheel Balancer Calibration Transcription
Welcome to DerekWeaver.com. In this video, we're going to detail the calibration of the W-957 wheel balancer. In order to calibrate the balancer, you'll need a 14, 15, or 16-inch wheel in good condition, and prior to the calibration, you'll need to remove the wheel weights and enter the wheel dimensions.
First, we'll enter the distance with the distance arm, entered with the distance key + or -. Next, the rim width, measured with the rim width caliper. It's entered with the Br+ key and then the diameter taken from the tire. In order to start the calibration procedure, first you will press the HOME key once, the DIS+ key once, then the HOME key twice. The screen will read POS and a number in this window. Rotate the turn wheel until the number is at 110. Press the People key and then rotate to 120. Press the People key again. Now the screen says “Add” “0.00.” Spin the tire wheel assembly. Line up your location and use your three and a half ounce calibration weight and line it up at top dead center or 12 o'clock. Pay close attention to the location - it's very important for the calibration to come out correctly. Spin the machine again. Remove the three and a half ounce calibration weight from this side and apply it to the inner plane at top dead center. Once again, paying close attention to where you put the weight. Spin the machine. The balancer has saved the information but it's always a good idea to re-save the information by hitting the HOME key and the diameter+ key.
It's always a good idea after calibrating to perform a wheel balance to verify that the balancer is working properly. Apply the necessary weight and verify that it does, indeed, balance the wheel. Now take a known weight amount, in this case we're using the two-ounce weight, and we're just going to apply it anywhere on the wheel to create a two-ounce imbalance. And again, spin the wheel. If the machine’s reading correctly, it will show two ounces on the plane where you put the weight as well as the two-ounce weight shows up at six o'clock. You can do the same thing for the outer plane. The two-ounce imbalance should line up directly at six o'clock. That concludes the calibration for the W-957 wheel balancer.
Thank you for using DerekWeaver.com for all your automotive equipment needs.
New Style W-MJ II Motorcycle Adapter Kit Transcription
Welcome to DerekWeaver.com. In this video, we will discuss some minor assembly changes to the W-MJ 2 motorcycle adapter. We'll start by unpackaging the motorcycle kit and describing the components. View the full transcription here.
Wheel Balancer Truck Kit Transcription
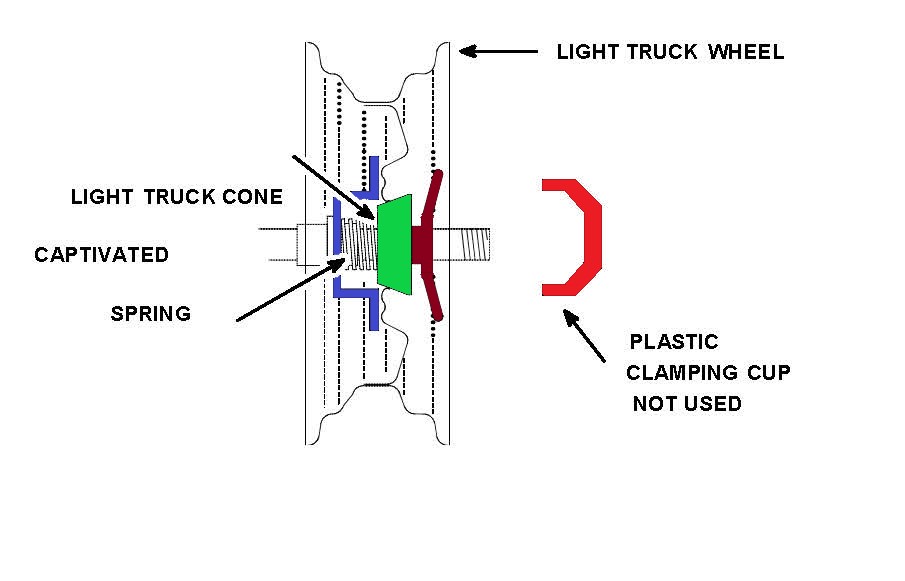
Welcome to DerekWeaver.com. In this video, we will show the components and demonstrate the assembly of the Weaver Truck Kit. View the full transcription here.
Weaver® W-937/W-957 ALU Modes Transcription
Welcome to DerekWeaver.com. In this video, we will cover the ALU function on the Weaver 937 balancer and the W-957 balancer. There are several reasons to use the ALU mode of balancing; one would be that there's no lip to attach a hammer-on weight to. Secondly, you may not want the weights to show on the outer plane of the wheel and you still want to provide a dynamic balance. View the full transcription here.
W-937 & W-957 Sensor Testing Transcription
Welcome to DerekWeaver.com. In this video, we're going to demonstrate testing the shaft position sensor and the balancing sensors for the W-937 and W-957 wheel balancers. View the full transcription here.
Troubleshooting Wheel Balancer Error Codes Transcription
Welcome to DerekWeaver.com. In this video, we're going to replicate the "error open" code and the “error speed” code. We're going to use a W-957, without a hood, to demonstrate these errors and how to correct them; however, the troubleshooting and correction is applicable to both or to all three of our wheel balancers: the W-937, the W-957, and the W-977. View the full transcription here.

